
|
|

|
|
|
 16-12-2009, 12:58 PM
|
#121 | ||
|
injection is nice, but...

Join Date: Jul 2007
Location: Camden, N.S.W
Posts: 1,070

|
just a quick update, sorry no photos.
Since we all got back from Echuca, work has been flat out and then christmas crash tackles you! I have been busy with the coupe. I was hoping to register it before the end of year, but, thats not going to happen. looks like Late feb early March. Why? Well as i had said in an earlier post, most of the rear half of the interior has been pulled out and changed. we now have matching bucket seats in the back. This required, New seat belts, enertia reel front and back, Removal of the stereo gear, Removal of a lot of braces for the old racing harnesses, Moving of the brake boosters. I needed to make, Spreader plates for the new seat mounts Buy new seats and modify ( cut 200mm off the top and 25 mm out of the centers of the back to fit in the coupe, as they hit the roof) Make new booster brakets, Make fill panels between the seats and the seat door trim area. Installed another 7" monitor and moved the PS2 to the rear of the car for my boy to use. This all started because i went to see an engineer to register the car in its previous guise as a two seater, he said if your going to eventually convert back to a four seater, do it now so it wont need to be re engineered. As a result, i've had him out to look over the car and it has passed for full street rego, barring a noise and brake test... Noise, knew i'd be over the limit, now making changes to the system to quieten it down a bit. Brakes, I had just mooved the boosters the day i rang to book the engineer for an inspection, it was a week later that i got around to bleeding the brakes and getting the car started again (it had been a month), this was the day before the inspection. sure enough, Murphy attacked again! The little rubber hose that controls vacuum from a valve in the (new) boosters had split and was allowing air pressure to leek in to the booster diaphram, result, locked front brakes! ie no brake test possible  : : Any ways, that issue is now sorted after ringing the supplier. They sent a replacement part that day. Coupe is due for a retrim in mid January, noise and brake test to follow and from there its through the rego process, so who knows how long that will take!! Ive even got new number plates chosen. Cheers for now |
||

|

|
|
16-12-2009, 02:38 PM
|
#122 | ||
|
Moderator Ford Coupe Club

Join Date: Dec 2004
Location: Vic
Posts: 3,905
|
Hi Gary,
Thanks for the update. Phew..... looks like lots of work to do. Still, it'll be nice to have it registered so you can take it out and enjoy it any time you like. Was great to meet you and the coupe at Echuca. Cheers, Craig.
__________________
Mitsubishi ASX Auto, White - Daily Commuter XC Fairmont Coupe, 351 4spd, Graphite Grey - The Antidote http://www.fordcoupeclub.org "If you don't know where you're going, any road will take you there" George Harrison 2001. |
||
|
|
|
|
22-12-2009, 10:38 PM
|
#123 | ||
|
Awesome

Join Date: Oct 2007
Location: In my own little world..Everyone here knows me :)
Posts: 9,401

|
Has Lachlan confiscated the keys yet??
 Great to hear you have got it all happening Gary. Keep us updated 
__________________
|
||
|
|
|
|
24-12-2009, 02:45 PM
|
#124 | ||
|
injection is nice, but...
Join Date: Jul 2007
Location: Camden, N.S.W
Posts: 1,070
|
Merry Christmas To All For Tommorrow!!!
|
||
|
|
|
|
24-12-2009, 03:04 PM
|
#125 | |||
|
moderator ford coupe club

Join Date: Jun 2007
Posts: 6,640
|
Quote:
the show is great enough, but the go as well . . . . wow |
|||
|
|
|
|
03-01-2010, 01:33 PM
|
#126 | ||
|
injection is nice, but...
Join Date: Jul 2007
Location: Camden, N.S.W
Posts: 1,070
|
yeah, well ive got a long ways to go with that. the motor in the car is a little fragile. hopefully after this rego thing is out of the way, i'll get stuck back into the new motor again and fire up this thread once more!!
|
||
|
|
|
|
04-01-2010, 10:39 AM
|
#127 | ||
|
injection is nice, but...
Join Date: Jul 2007
Location: Camden, N.S.W
Posts: 1,070
|
Hi all,
We managed to recover some shots from earlier in the year, that were thought lost in the crash of our laptop, i'll post with a small comment as most have already been written about and you would have seen at Echuca. Unfortunatley, the manufacturing shots were lost it seems, ie the heater tap and dizzy shots, oh well. 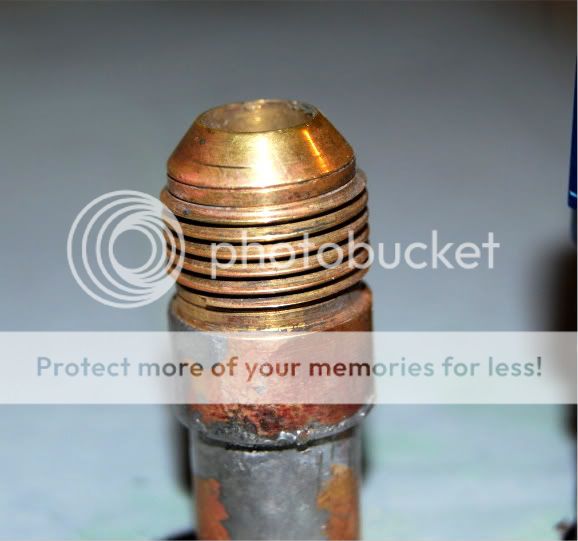 Brass fittings, before polishing (cant see them anyway) 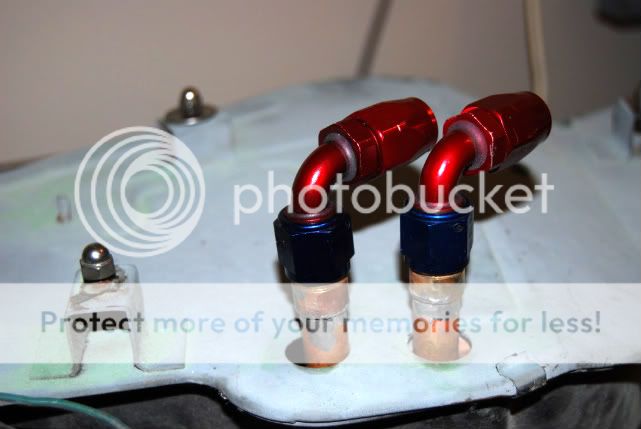 These are the brass fittings i made to adapt earls fittings to your heater box without using hose clamps.  This is the same fitting but in 316 stainless, tig welded to some 5/8" 316 tube for the heater hose. the bottom hose is already connected to the fittings.  An over all shot. brackets tiged to the tube hold it to the end blower studs.   This is the "billet" heater tap, it is made to accept the factory control cable, this was fun to make, pity it is hidden behind the blower case! at least I know its there!!  And the whole system before installation.  This is the mess i had after removing the heater box to paint and silver solder the new connections on. I had to cut so many wires to get it out, but i didnt want to remove the dash to do it. Man, this took a week to sort out. As i said before, the heater box was the first thing i installed when the shell got painted so wiring and such were all installed over the top of it! 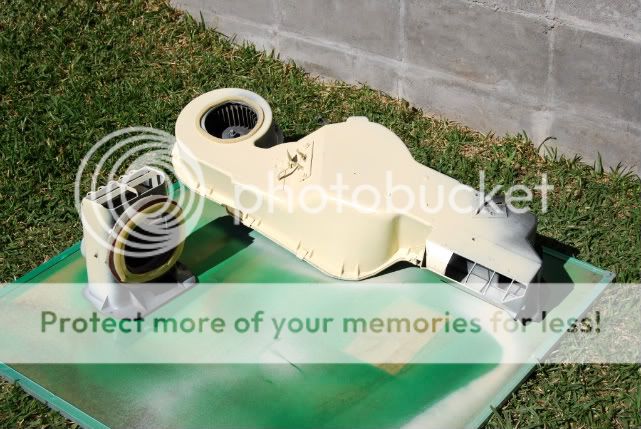 The painted heater box and ducting (previously black) 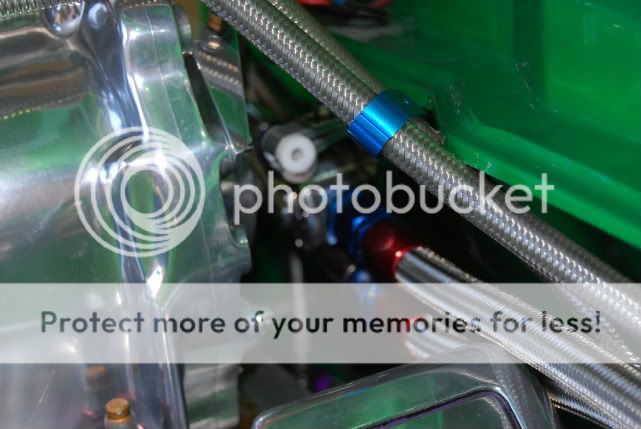 And a shot of the heater tap behind the blower case. |
||
|
|
|
|
04-01-2010, 10:47 AM
|
#128 | ||
|
335 - STILL THE BOSS ...

Join Date: Dec 2004
Location: Melb East
Posts: 11,421
|
Amazing stuff Gary. The amount of one off stuff is huge and the amount of earls fittings would be enough to fund a small country! Keep the pics coming
| [/url] |
__________________
'73 Landau - 10.82 @ 131mph '11 FG GT335 - 12.43 @ 116mph '95 XG ute - 3 minutes, 21.14 @ 64mph 101,436 MEMBERS ......... 101,436 OPINIONS ..... What could possibly go wrong! Clevo Mafia [SIGPIC][/SIGPIC] |
||
|
|
|
|
04-01-2010, 07:26 PM
|
#129 | ||
|
the money box

Join Date: Apr 2008
Location: blacktown
Posts: 417
|
our mate gaz doesn't mess around a true perfectionist
|
||
|
|
|
|
09-01-2010, 07:58 PM
|
#130 | ||
|
injection is nice, but...
Join Date: Jul 2007
Location: Camden, N.S.W
Posts: 1,070
|
hey Colin,
Rumor has it that its on again, i'm calling it "Parched as Bro'",2011. Should be bringing the boys with us next year, ie Rooney and Nabs. mmm, may need more beer next time.... |
||
|
|
|
|
09-01-2010, 08:46 PM
|
#131 | ||
|
COUPE WHORE

Join Date: Nov 2007
Location: were ever i pass out
Posts: 2,489
|
Jesus Gary im blinded buy all the bling,looking great mate: )
__________________
Rides 1974 Malvern Star Dragstar pushbike mods; bald back tyre, big sissy bar, speckled paint job and buckled front wheel |
||
|
|
|
|
11-01-2010, 06:02 PM
|
#132 | |||
|
the money box
Join Date: Apr 2008
Location: blacktown
Posts: 417
|
Quote:
|
|||
|
|
|
|
12-01-2010, 10:37 AM
|
#133 | |||
|
injection is nice, but...
Join Date: Jul 2007
Location: Camden, N.S.W
Posts: 1,070
|
Quote:
Its all a means to an end, full NSW Rego.Might as well have it looking good instead of an add on. The engineer has been out and signed off on the car with a few points outstanding, im fixing those now. it will require the motor to come out again. This is to wrap the extractors with heat wrap isulation, darn things wont come out with the motor in. Also put a balance pipe in the exhaust system and 2 extra mufflers as well to quieten it down a bit. So, ive got a credit card bill to pay off then its off to the trimmers to get the rear seats trimmed, then rego. I can almost tast it!!. |
|||
|
|
|
|
12-01-2010, 10:40 AM
|
#134 | ||
|
COUPE WHORE
Join Date: Nov 2007
Location: were ever i pass out
Posts: 2,489
|
mate well done: )be great to hopefully see the car hooning around on the streets
 : :
__________________
Rides 1974 Malvern Star Dragstar pushbike mods; bald back tyre, big sissy bar, speckled paint job and buckled front wheel |
||
|
|
|
|
12-01-2010, 06:56 PM
|
#135 | ||
|
the money box
Join Date: Apr 2008
Location: blacktown
Posts: 417
|
gaz give me a call when you want to pull the donk out so i can give you a hand i can help you pull the motor out and you can help me drink the beer i bring over
|
||
|
|
|
|
14-01-2010, 12:14 PM
|
#136 | ||
|
injection is nice, but...
Join Date: Jul 2007
Location: Camden, N.S.W
Posts: 1,070
|
Gunna start disconnecting every thing duing the rest of this week, pick up the hoist from Deano's place, then just gotta work out a time to do it.
|
||
|
|
|
|
17-01-2010, 06:25 PM
|
#137 | ||
|
injection is nice, but...
Join Date: Jul 2007
Location: Camden, N.S.W
Posts: 1,070
|
started pulling stuff off the motor in readdyness for pulling it out next weekend (sorry Colin).
Also got a new engine stand to put it on for the time its out, that makes a total of three i own now!!. Had a good look and i think ill be able to pull the extractor out with out pulling the motor, but there is a small oil leak that is sh&#ting me, so it will come out anyways. Gunna see if the 'zorst comes out first but, just for future reference. |
||
|
|
|
|
24-01-2010, 06:42 PM
|
#138 | ||
|
injection is nice, but...
Join Date: Jul 2007
Location: Camden, N.S.W
Posts: 1,070
|
passenger extrator comesout, drivers doesnt, even removed the engine mount bolts and jacked it up and sidways. no luck.
Found the small oil leak, manifold hadnt seal up against the block at the rear near the oil sender. easy fix. Now out with the motor..... |
||
|
|
|
|
01-02-2010, 10:43 AM
|
#139 | ||
|
injection is nice, but...
Join Date: Jul 2007
Location: Camden, N.S.W
Posts: 1,070
|
update.
Motors out.with only one scratch, up under the tranny tunnel. Found a few issues ill sort whilst its out. Oil leak, back of the manifold, took it to work and took a few thou off the manifold faces to true it up and about 125 thou off the ends where it seals to the horizontal block face. i dont use either the cork of rubber gaskets here just a fine bead of 225 sikaflex urethane. sorted. Exhaust leak. cylinders 1 and 7 had an exhaust leak at the face of the block. Not too much i can do, but will be using a sealant when the extractors go back on instead of dry gaskets. also brought some grade 12, 12 point bolts and hardened machine washers to use instead of "extractor" bolts, these are stronger and use a 3/8" spanner or socket to drive, the washers i hope will allow me to spread the load better. Sent them off for nickel plating, and dont they look great. Nickel shouldnt crack off like chrome as it is softer and isnt as thick, plenty of copper antisieze will help. Will be making new extractor for the new motor anyway, probley out of stainless. ill use 10mm plate for the flanges so i dont have to crank too hard on the exhaust bolts in the aluminium heads and go down to 1 7/8" primaries from 2". will need to make some transitions to the new AFD heads as well. Stripped thread in the bellhousing. dunno how or why, just is. A 7/16" UNC Helicoil sorted it out. Found a small oil leak from the gearbox layshaft, behind the bellhousing. will sort this out too. Cleaned down the engine and bay. After towing the coupe 2000Km to Echuca and back, the engine and engine bay were coated in a fine layer of deisel soot from the tow car. (entire underside of car too!) Radiator overflow pipe. it pulled out of the radiator neck, the solder broke. might be a job for arildite or metal magic as i dont want to repaint the radiator fron soldering with a torch.. So.... Originally pulled the motor to wrap the extractors for the engineer to pass the car for NSW rego. i have used black extractor wrap, 50 feet of 1" wide and about 15 feet if 2" wide. this has done one side only. so its back to Rocket industries on Friday if i get the chance to pick up some more and some more clamps as well. It doesnt look too bad, but i much prefer unwrapped pipes. Will wrap the passenger side extractor next week and reload the motor the next weekend. Then its back onto the interior work, then on to the trimmers.. Last edited by MEANXBCOUPE; 01-02-2010 at 11:02 AM. |
||
|
|
|
|
01-02-2010, 04:56 PM
|
#140 | ||
|
COUPE WHORE
Join Date: Nov 2007
Location: were ever i pass out
Posts: 2,489
|
congratulations on pulling it out with only 1ding
: every time i do stuff like that it looks like some one took to my car with a hammer: (good luck with the rego gents
__________________
Rides 1974 Malvern Star Dragstar pushbike mods; bald back tyre, big sissy bar, speckled paint job and buckled front wheel |
||
|
|
|
|
01-02-2010, 11:46 PM
|
#141 | ||
|
Awesome
Join Date: Oct 2007
Location: In my own little world..Everyone here knows me :)
Posts: 9,401
|
Got any pics of the bolts nickel plated Gary? Good to see you are still getting into it.
Looking forward to catching up with you guys again. I hear Trev is thinking of coming to the next Echuca?
__________________
|
||
|
|
|
|
04-02-2010, 10:10 AM
|
#142 | |||
|
injection is nice, but...
Join Date: Jul 2007
Location: Camden, N.S.W
Posts: 1,070
|
Quote:
|
|||
|
|
|
|
04-02-2010, 10:12 AM
|
#143 | |||
|
injection is nice, but...
Join Date: Jul 2007
Location: Camden, N.S.W
Posts: 1,070
|
Quote:
I'll get on to taking some photos |
|||
|
|
|
|
06-02-2010, 01:16 PM
|
#144 | ||
|
injection is nice, but...
Join Date: Jul 2007
Location: Camden, N.S.W
Posts: 1,070
|
if the rain would clear up, im ready to swing it motor back in.....
Goto start putting the old brain back into interior mode again, kind of left it a bit as i wasnt happy with the design i came up with- little bit too "fast and furious" not enough "classy muscle". So i went about doing the mechanical stuff. Should have some pics up soon!. |
||
|
|
|
|
08-02-2010, 11:29 PM
|
#145 | ||
|
injection is nice, but...
Join Date: Jul 2007
Location: Camden, N.S.W
Posts: 1,070
|
As promised, photos!
the first is of the new bolts for the extractors. 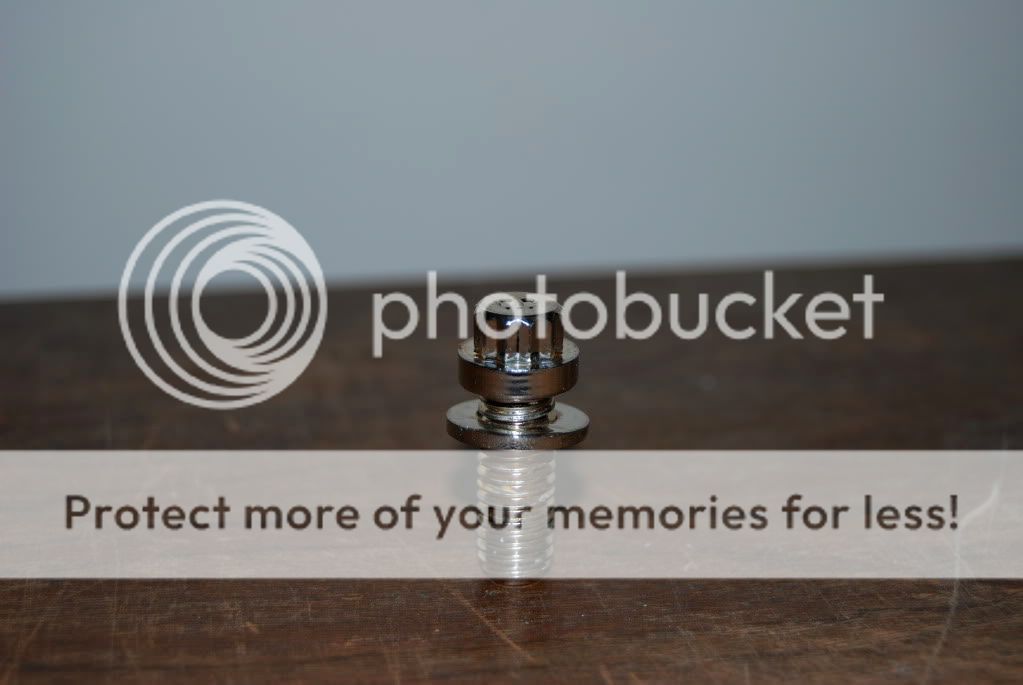 And how they sit 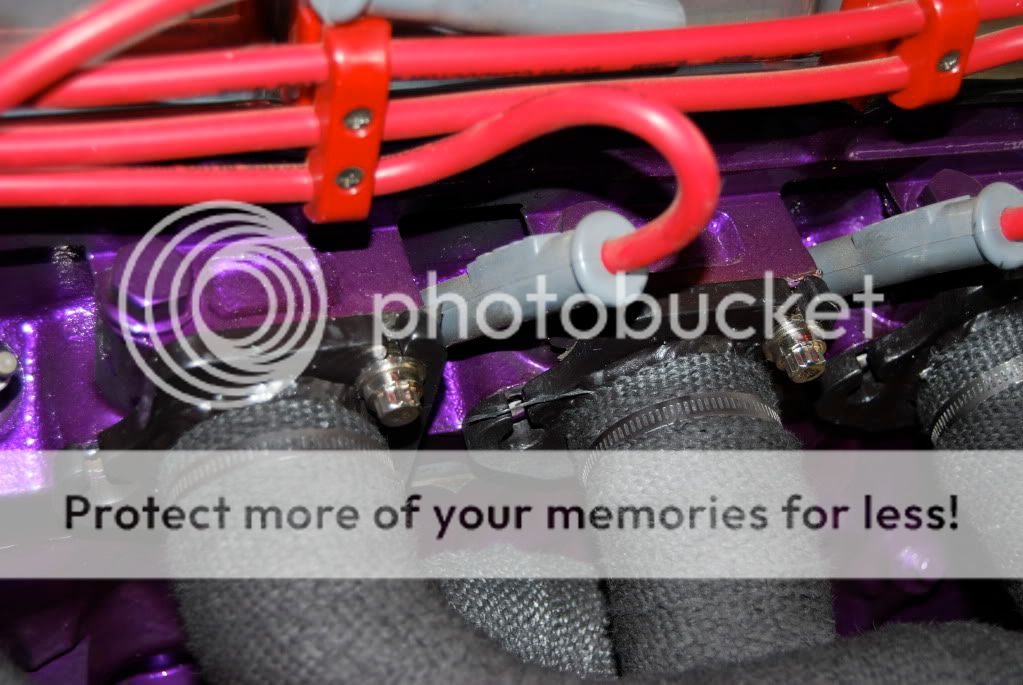 The new bolts need a 12 point spanner/socket to tighten and use a 3/8 hex size, this is compared to a normal extractor bolt of the same thread, 3/8 UNC, using a 7/16 spanner or a normal hex bolt using 9/16 AF, should be slightly easier to do up. They also have "machine" washers, which is saleman talk for ground and hardened washers. a trick i used was making them out of 5/16 washers, drilling out the holes to 3/8" giving a smaller outside dimension allowing them to fit much better!. Also they are nickel coated as posted prevoiusly, first time ive used this and i got to say looks tops!, looks a little yellow/goldish than the straight chrome finish, and the fact that there isnt the layer of chrome on top, it shouldnt crack and rust (i hope). Here is a shot of the extractors wrapped up. 2 things, not too happy on the looks of wrapped extractors and it sucked doing it!. i was warned, so i soaked the roll of insulation in cold water before starting as the black wrap is only carbon on the white wrap as far as i can tell, so it would get everywhere if it was dry whilst wrapping. having said that it was still a messy job. used the correct clamps, next time ill use stainless MIG wire to tie it off, would work out cheaper and look just as good if done right. Hope fully it will keep some heat out of the engine bay a bit. 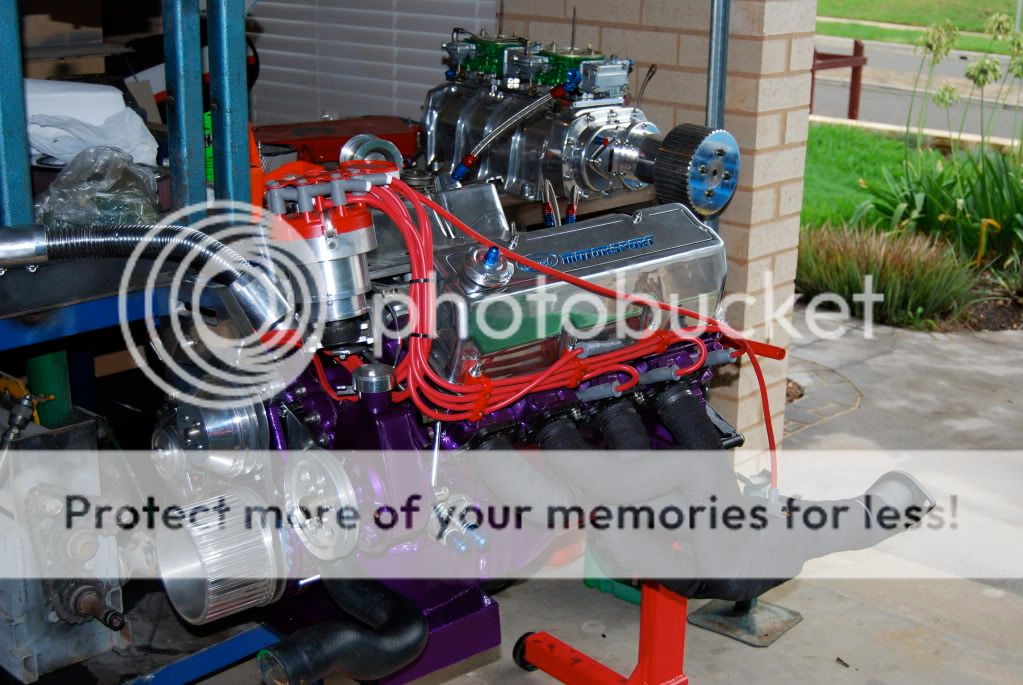 Originally i was only going to do the bits that the engineer suggested were too close, ie exhaust to steering column and exhaust to steering rack boots, so i brought a 50 foot roll of 1 inch wide wrap and a 50 foot roll of 2 inch wide wrap. I changed my mind and decided to do the whole lot, it cost me anothe roll of 1 inch and a second packet of ties!. total cost close to $370.00 : Also a shot of the helicoil in the bellhousing done. 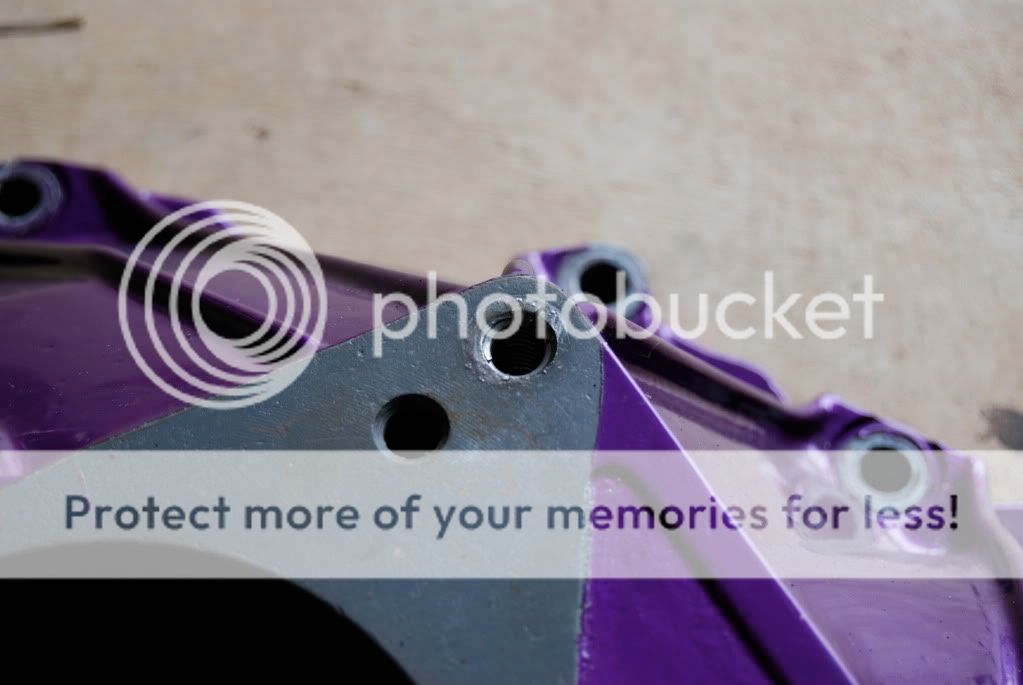 While i had to motor out i cleaned up the clutch slave cylinder and gave it a once over with the buffing wheel, also made a new push rod for it that is adjustable, out of 316 stainless. didnt get too crazy about it, just enough to clean it up, also polished and painted the starter motor and spacer as well as adding stainless bolts to neaten up the install. 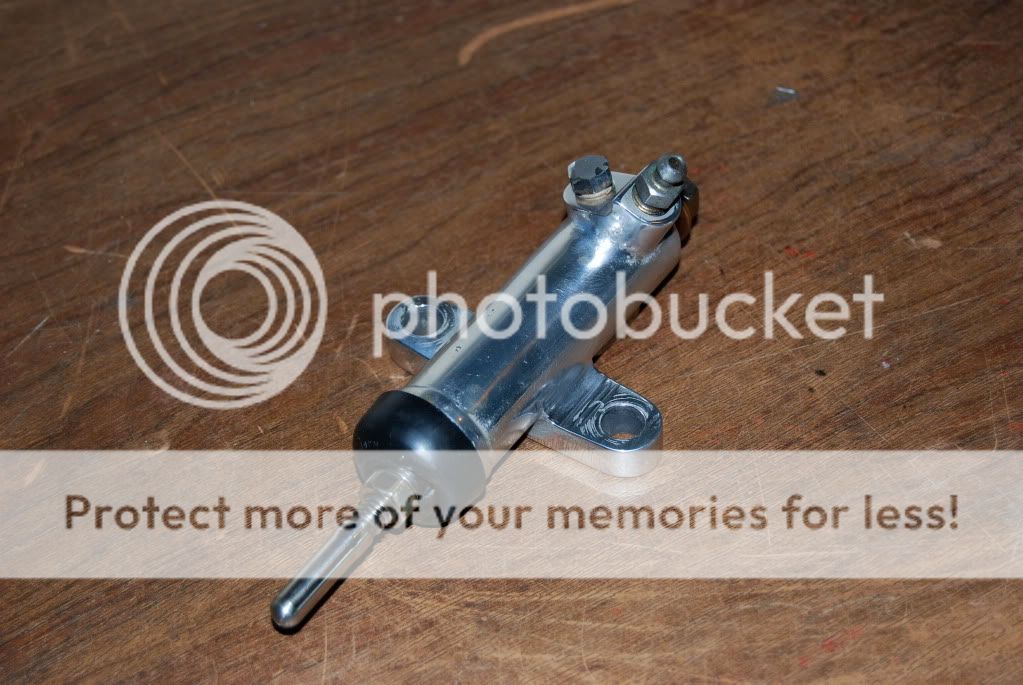 This is a photo of the manifold. put two new 45* fittings in as the old ones leaked fuel/air. they had gotten mixed up with other fittings and were BPS thread instead of NPT, which the manifold was tapped for. Should mention that these are the line for the boost referencing for the carbies. the other fitting, not connected is for the boost gauge.  Also the under side of the maniflod where i milled some off to straighten it out a bit and give some room for the sikaflex to adhere to. 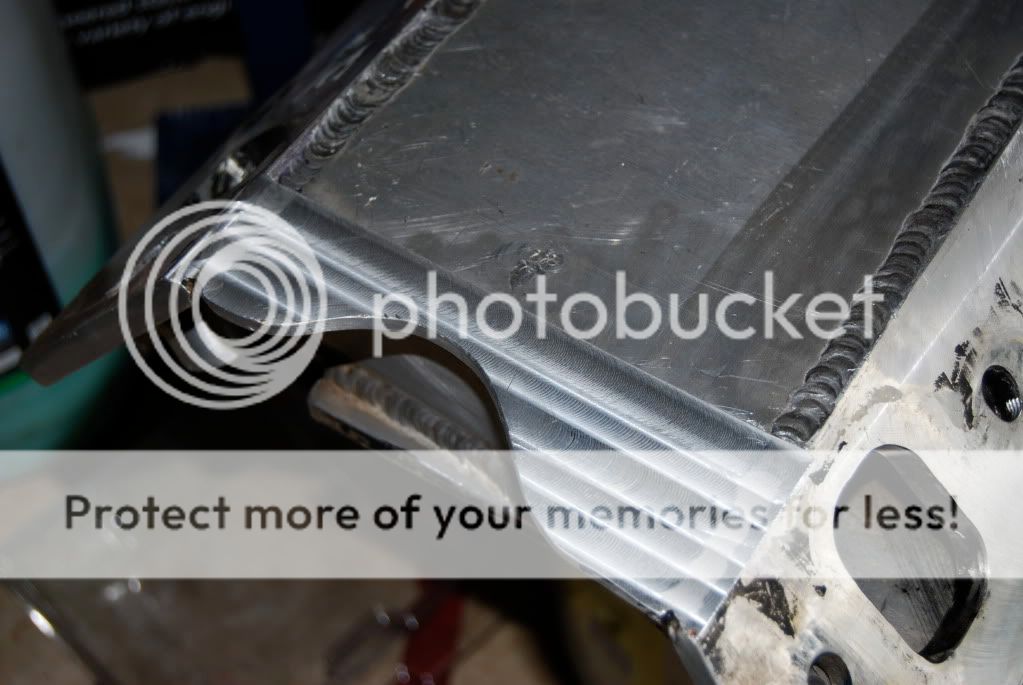 . .So thats about it for the moment, slot the motor in and re install the 'zorst, fire it up. then on to the interior again as said.. Cheers. |
||
|
|
|
|
09-02-2010, 01:15 AM
|
#146 | ||
|
Regular Member

Join Date: May 2007
Posts: 489
|
Watch that header wrap mate, I've read a few articles from the US and they reckon it makes mild steel headers rust out fast.
|
||
|
|
|
|
09-02-2010, 10:17 AM
|
#147 | ||
|
injection is nice, but...
Join Date: Jul 2007
Location: Camden, N.S.W
Posts: 1,070
|
yeah, ive been told the same.
its to get the thing through engineering/rego, once thats out of the way, maybe another solution. But for the moment its a quick fix. |
||
|
|
|
|
09-02-2010, 12:14 PM
|
#148 | ||
|
injection is nice, but...
Join Date: Jul 2007
Location: Camden, N.S.W
Posts: 1,070
|
In the prevous posts i said i had to helicoil a thread in the bellhousing to recover the stripped thread.
Thats all well and good, but it occured to me that some people starting out in the car game or that have an office job that isnt exposed to this hands on work, may have only heard about the process and not really understood the actual way its done. The AFF is a wonderfull thing in that it brings people from all walks of life together! So i thought i might do an artical on helicoiling for beginners! As a bit of background of my carrer, i have now being a fitter machinist for near on 20 years, and have specialized as a maintenace fitter for all but 4 of those and that was my apprenticeship as a Fitter machinist anyway. Lately,my day to day activities include breakdown repairs, preventitive maintenance and continual improvement of 5 fast paced production lines in a well known fast moving consumer goods factory. Previous work i've done included a 2 year stint as a car fabricator / builder, building show cars for customers, untill both the poor bussiness skills of the owner of the shop and the GFC caught up and i quit what was my dream job. Also worked for one of Australia's largest insulation companies for 7 years as the Maintenance supervisor, organising up to 16 tradesmen with jobs and planning, ect. previous to that. Completed my apprenticship and stayed on as a maintenace fitter with a government dept. for 10 year prior to that. On with the show. Before I start, this isnt the only way to recover threads that are damaged, this is only one way of various ways to do the job. I must also mention that "helicoil" is a brand name, but has become so well known that in industry, its name has stuck to to the process im about to show. Other methods of thread recovery vary, either because the thread in question is male or female, tapered thread or a non standard type thread, eg square (check the screw on your vice ) or buttress type( similar to a saw tooth profile). Other methods may include one or more of the following; # Replacing the bolt or nut! ( first choice if possible) For castings or weldments (fabricated parts) # Chasing the thread with a tap ( repairs damaged, but intact female threads) # Drilling, plugging and re tapping. # Drilling and tapping to the next size up. For studs in the above. # Chasing the thread with a die nut ( damaged male thread). # using a thread file to clean out debris and damaged threads ( male and female). I could go on (and have been!). The helicoil, as mentioned is a brand name, i'm using the brand "recoil" as its a lot cheaper, and made in Australia (verses USA),comes as a kit and is as good as other brands. As a guide the kit im using today cost around $90.00 plus GST at trade discount rates, figure $120 over the counter. For that you get - drill of the correct size, - High speed steel tap, not a cheap carbon steel one. - the installation tool - a tang removal tool - and 3 lengths of inserts totaling 18 all up. You can buy just the inserts once youve used them up, retaining the kit. 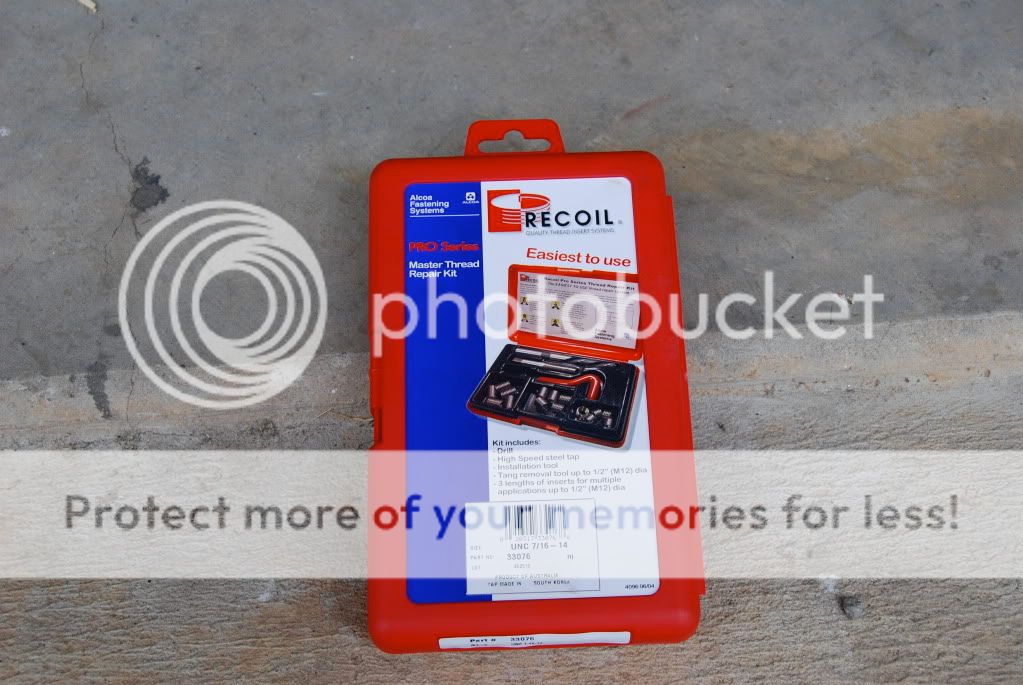 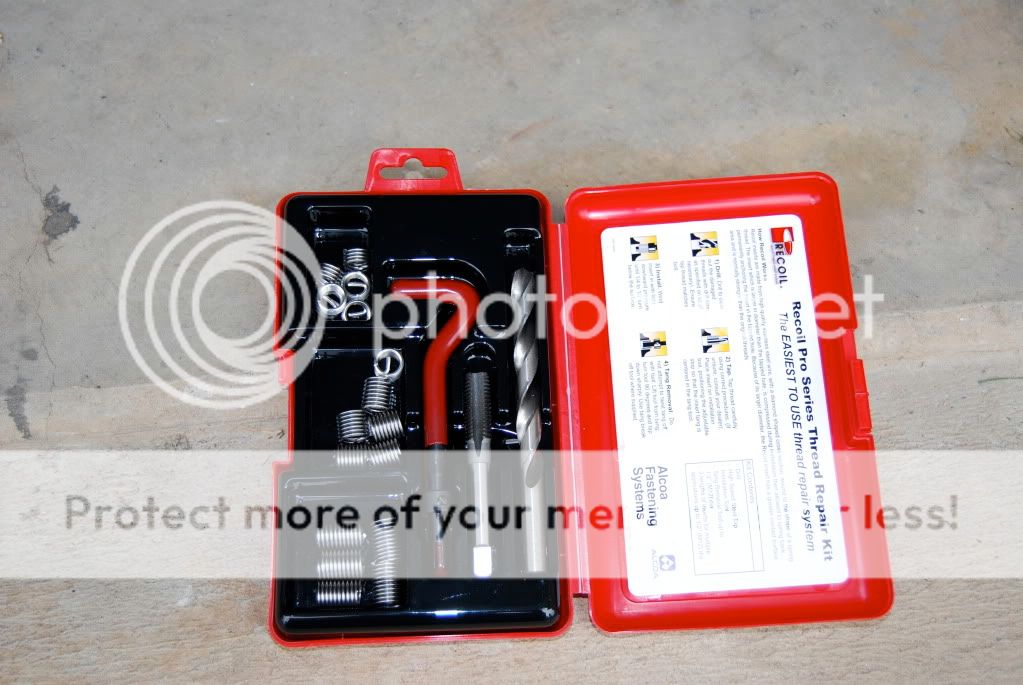 On the cover of the box you can see the thread size, for this application, UNC 7/16"-14. Quick explanation, UNC is the thread form, "Unified National Course" 7/16" is the outside dimension of the male thread in fractions of inches. -14 is the TPI, or Threads Per Inch, the number for complete threads over a measured inch of the bolt. this will change for a fine threads ( greater number) and metric as well as different diameters of bolts. Also as a tip for beginners, the bolt size the the thread diameter, NOT the spanner size you use to tighten it! i have heard this asked at an engineering supply shop. The threads that attach the gearbox to the bellhousing , the one's that hold the bellhousing to the engine block, engine mount bolts and the one's that hold the accessories to the heads are all 7/16 unc on a clevo. How a "helicoil" works. The inserts are made from a high qualitiy stainless steel wire, with a diamond shaped cross section, wound to the shape of a spring thread. The insert which is larger in diameter than the tapped hole, is compressed during installation then allowed to spring back, permanently achoring the insert in the tapped hole. Beacuase of its lager diameter, the insert has a greater contact surface area and is normally stronger than the original threads. [B]How to do it[/B] 1. Drill. Drill the hole with the suppied drill. This is sized correctly for the insert. sometimes it isnt required if the thread has been totally ripped out, but this would be classed as an advanced method only, first timers, use the drill. Ensure the new hole is in the same plain as the original, use a drill press if you can for better results. im using a hand drill for this as a few threads were missing from the top of the bolt hole giving me a start. 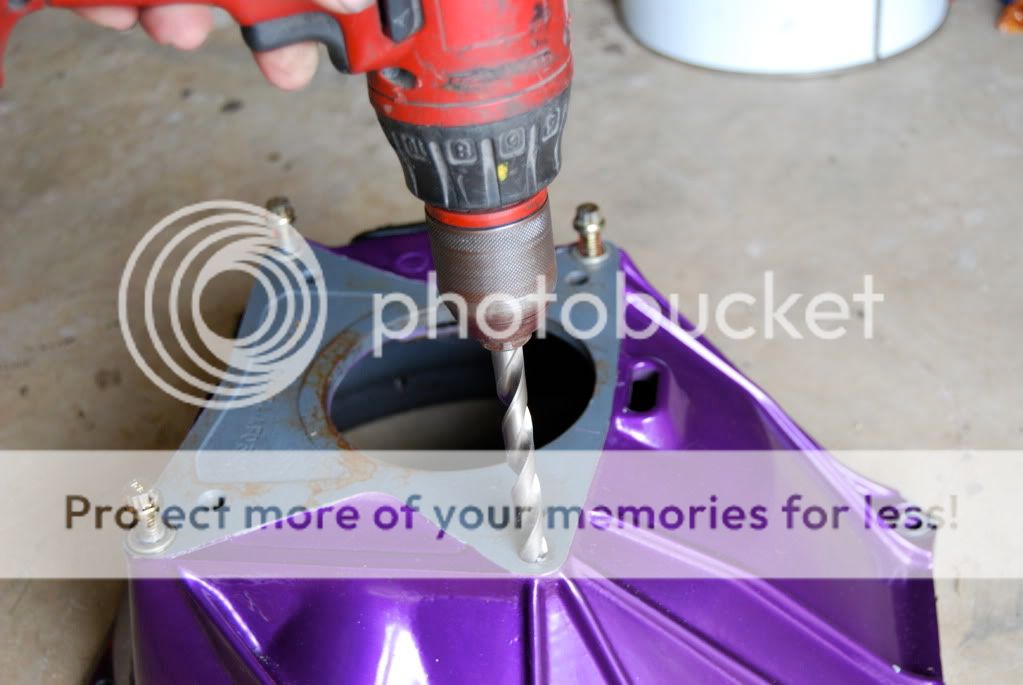 2. Tap. Tap the thread carefuly, using downward pressure and go slow, some tapping compound may help, but as im going into cast iron, none is really needed. Once you have the tap started, for every one complete turn of the handle, back it out about a 1/3 of a turn, this removes the chips of metal from the new threads as they are formed and will help stop the tap getting jammed. Dont be afraid to take the tap all the way out and clean it if your having a hard time. Proberly another whole artical on tapping threads could be written. Dont force the tap!, if you think your in trouble now, wait till you break a jammed tap in a hole. Use two hands in the tap wrench ( im taking the photo with the other!). Tap as deep as you can, or all the way through on an open hole. It must be said that the taps a specially made for this application and they wont work as a regular tap, that is, no bolts are available to go straight into the tapped hole. why?, glad you asked. Because the TPI will be incorrect for the diameter of the tap, which, is an odd size anyway to account for the thickness for the insert.. 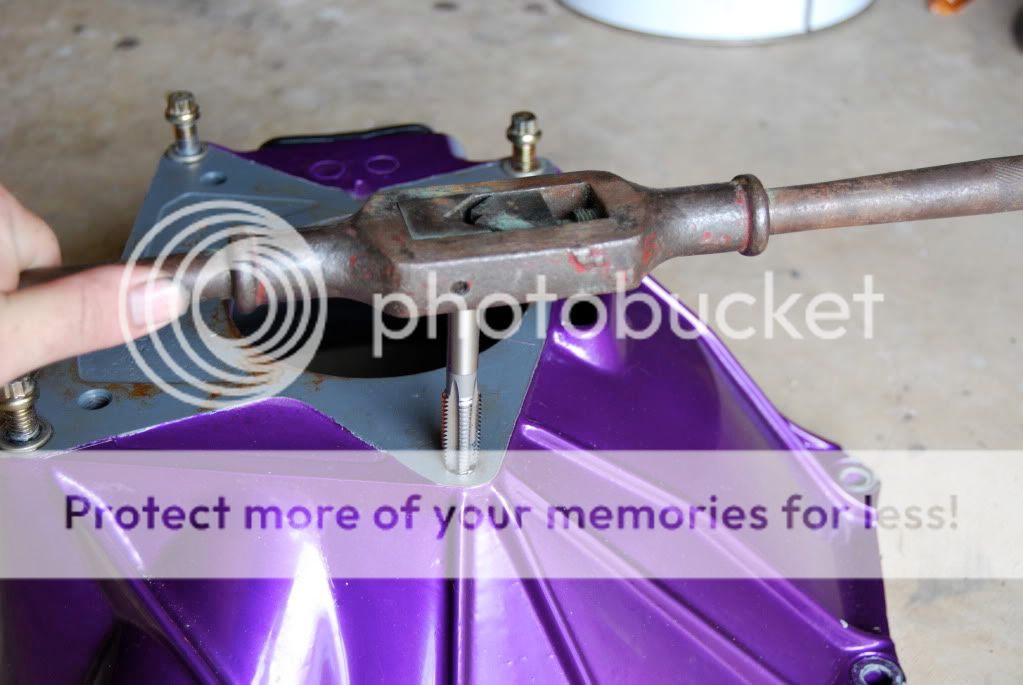 3. Install the insert. Place the insert on the end of the tool provided and adjust backstop. Wind into the newly tapped hole with light downward pressure untill it is 1/4 to 1/2 a thread below the surface, check the hole depth before starting in the case of a blind hole. It must be said, you only get one go at this as it wont wind out. you would need to grab it with pliars and pull it out, if it still didnt go in deep enough, destroying the insert.  This is an insert. 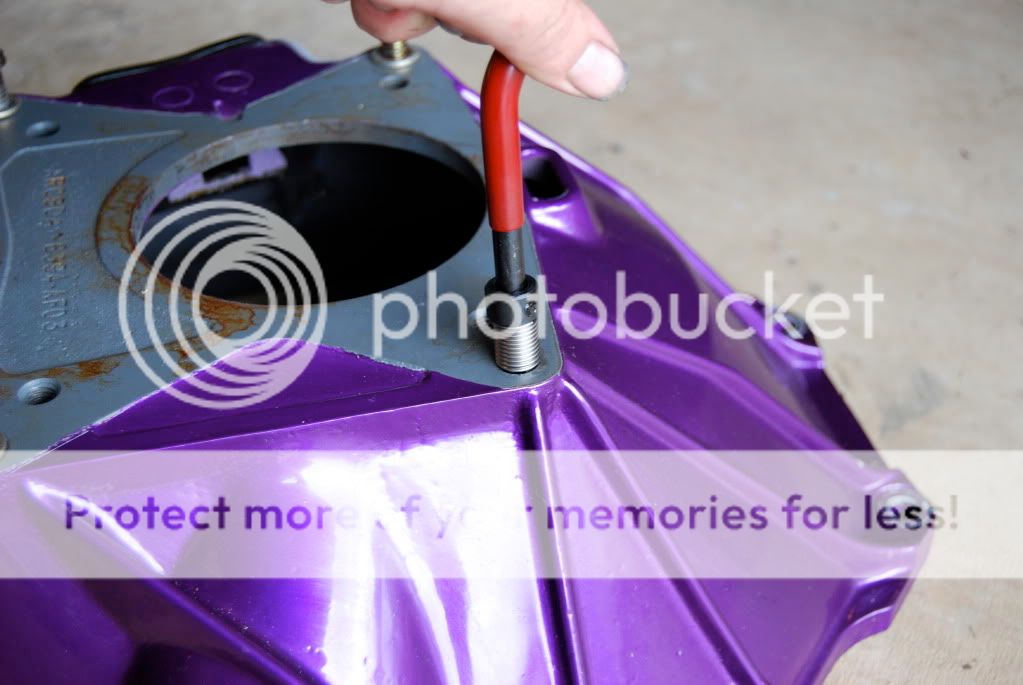 Tang removal. Withdraw the insert tool a 1/4" and turn 90*. make a sharp tap on the tool with a small hammer. this will shear off the driving tang. hard to photograph. no photo. Before shot 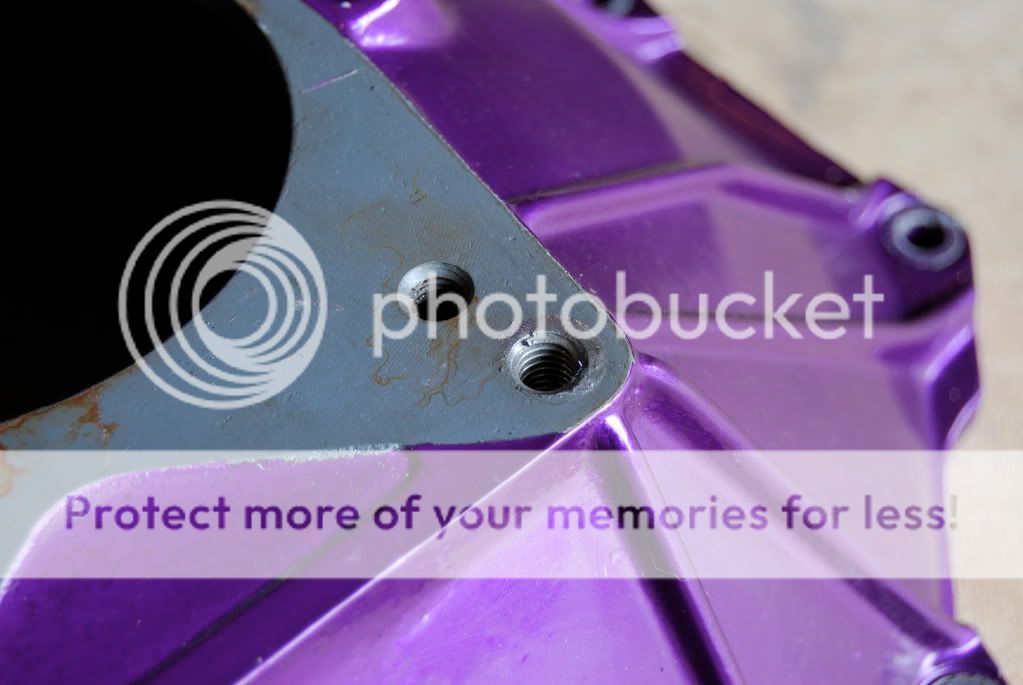 After shot. with antisieze around it, after checking for fit. So all finished, strong and reliable. hope you may have learnt something, or just killed a bit of time reading this dribble, for that im sorry!  : : : :
|
||
|
|
|
|
09-02-2010, 08:42 PM
|
#149 | ||
|
the money box
Join Date: Apr 2008
Location: blacktown
Posts: 417
|
the mans a genius
 : :
|
||
|
|
|
|
09-02-2010, 09:25 PM
|
#150 | ||
|
'69 XW

Join Date: Dec 2007
Location: Bris Vegas
Posts: 726
|
Awesome write up! As always, great detail and photos. I'm not a huge fan of wrapped headers either but the black tape looks much better than the white, nice stealth look. Not good on the wallet though...
|
||
|
|
|


 Linear Mode
